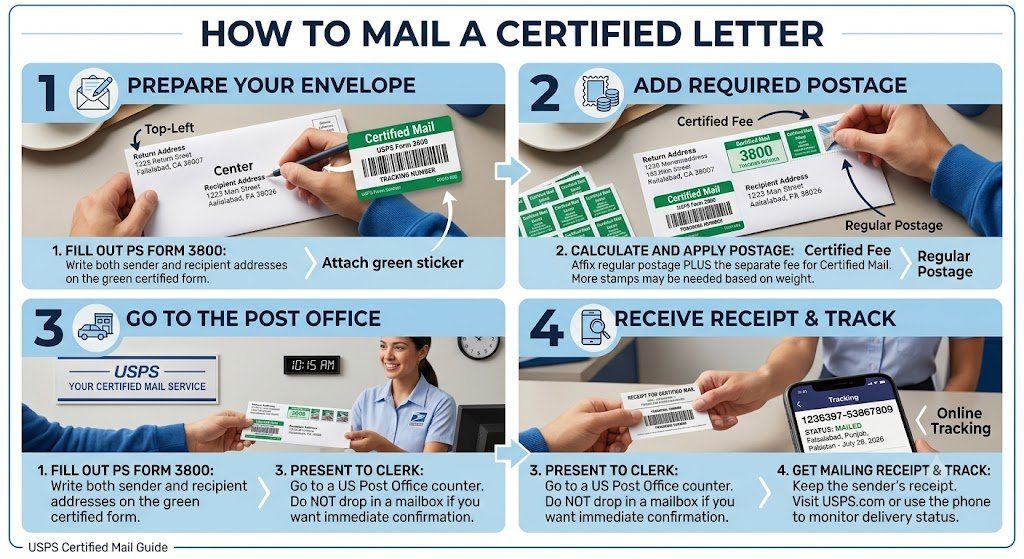

If you’re wondering how to mail a certified letter, you’re not alone. Certified Mail is one of the most trusted mailing services offered by the United States Postal Service (USPS), giving you proof that your letter was mailed and confirmation when it reaches its destination. Whether you’re sending legal documents, tax forms, business correspondence, or an important personal notice, Certified Mail provides peace of mind that regular First-Class Mail simply can’t match.
Many people assume the process is complicated, but it’s actually straightforward once you understand each step. This guide explains everything you need to know—from preparing your envelope to tracking delivery—so you can confidently send your next certified letter.
What Is Certified Mail?
Before learning how to mail a certified letter, it’s helpful to understand what Certified Mail actually is.
Certified Mail is a USPS service that provides:
- Proof of mailing
- A unique tracking number
- Verification that delivery was attempted or completed
- An official mailing receipt
Unlike regular mail, Certified Mail creates a documented mailing record. This documentation is frequently used in legal, financial, insurance, and government-related communications where proving that something was mailed can be important.
When Should You Mail a Certified Letter?
Certified Mail is commonly used whenever proof of sending and delivery matters.
Examples include:
- Legal notices
- Demand letters
- Lease termination notices
- Tax documents
- Court correspondence
- Insurance claims
- Estate documents
- Business contracts
- Employment-related notices
- Official complaints
Although you can send almost any letter using Certified Mail, it’s especially valuable when disputes could arise later.
Benefits of Mailing a Certified Letter
Learning how to mail a certified letter isn’t just about following USPS procedures—it’s about protecting yourself.
Some of the biggest advantages include:
- Official mailing receipt
- USPS tracking from acceptance through delivery
- Delivery confirmation
- Evidence for legal or business purposes
- Reduced risk of disputes
- Greater confidence when sending important documents
These benefits explain why attorneys, landlords, businesses, government agencies, and everyday consumers regularly choose Certified Mail.
What You’ll Need Before Visiting the Post Office
Preparing everything in advance makes the mailing process much faster.
You’ll need:
- Your completed letter
- A properly addressed envelope
- Recipient’s full mailing address
- Your return address
- Government-issued ID (occasionally helpful for certain transactions)
- Payment method
- USPS Certified Mail Form 3800
If you also want proof that the recipient personally signed for the letter, you may choose to add a Return Receipt service.
How to Mail a Certified Letter: Step-by-Step
Now let’s walk through how to mail a certified letter from beginning to end.
Step 1: Prepare Your Letter
Write, print, or organize your documents before sealing the envelope.
Double-check:
- Recipient’s name
- Street address
- Apartment or suite number
- City
- State
- ZIP Code
Even a small addressing error can delay delivery.
Step 2: Place the Documents Inside the Envelope
Insert your documents carefully.
Seal the envelope securely.
Avoid overstuffing the envelope because bulky envelopes may require additional postage.
Step 3: Address the Envelope Clearly
Write the recipient’s address in the center.
Place your return address in the upper-left corner.
Use dark ink and block lettering for maximum readability.
Step 4: Obtain USPS Certified Mail Form 3800
One of the most important parts of learning how to mail a certified letter is understanding Form 3800.
This green-and-white sticker includes:
- A barcode
- A tracking number
- USPS mailing information
The postal clerk can provide this form free of charge at the post office.
Step 5: Complete Form 3800
Fill out the required information.
Typically you’ll enter:
- Recipient’s mailing address
- Your return address (if required)
- Additional mailing options if selected
Take your time to ensure everything matches the envelope exactly.
Step 6: Attach the Certified Mail Label
Peel the adhesive backing.
Place the barcode portion across the top edge of your envelope without covering the mailing address or postage area.
Proper placement allows USPS scanners to read the barcode throughout the delivery process.
Step 7: Decide Whether You Need Return Receipt
Many people confuse Certified Mail with Return Receipt.
They’re different services.
Certified Mail provides:
- Mailing receipt
- Tracking
- Delivery record
A Return Receipt provides additional confirmation showing who accepted the letter and when it was delivered.
You can request:
- Physical signature card
- Electronic signature confirmation
Although optional, Return Receipt is commonly recommended for legal correspondence.
Step 8: Pay for Postage and Certified Mail Fees
Bring the completed envelope to your local USPS retail counter.
You’ll pay for:
- Regular postage
- Certified Mail fee
- Optional services (if selected)
The postal clerk will process your mailing and provide an official receipt containing your tracking number.
Do not throw away this receipt.
It serves as your proof that the letter entered the USPS system.
Step 9: Track Your Certified Letter
After mailing, use the tracking number printed on your receipt.
Tracking allows you to monitor:
- Acceptance
- Processing
- Transit
- Arrival at destination
- Delivery
- Delivery attempts
This visibility is one of the primary reasons people choose Certified Mail over standard First-Class Mail.
How Long Does Certified Mail Take?
Delivery speed depends on several factors, including destination, weather, holidays, and local processing volumes.
Typical domestic delivery ranges from 2–5 business days, though times can vary.
Certified Mail travels with regular First-Class Mail while adding tracking and documentation throughout the process.